1. Excel How to lock cells ?
This technique is useful, for example, if you are filling in a part of an Excel sheet, that you are going to send it to one or more collaborators to complete it and you want your collaborators to have no possibility of modifying the part that you have filled out.
Example
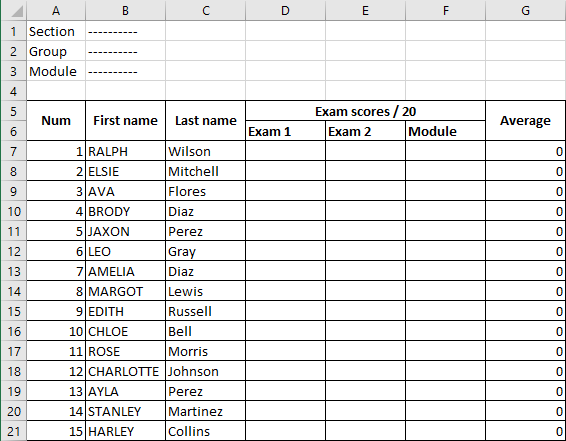
Consider, for example, lists of students to be sent to the responsibles of the modules to fill them in with the students' grades.

Desired result : Lock the entire sheet except the range of cells D7:F21.
How to do ?
Note that by default all cells in the sheet are set to "locked" except that this lock only takes effect when you protect the sheet. In other words, if you protect the sheet, then all cells will be locked.
Therefore, you should proceed as follows:
- Unlock the range(s) of cells that you want to remain editable. This is the range D7:F21 for our example.
- Then protect the sheet
Unlocking the range D7:F21 :
- Select the cell range D7:F21
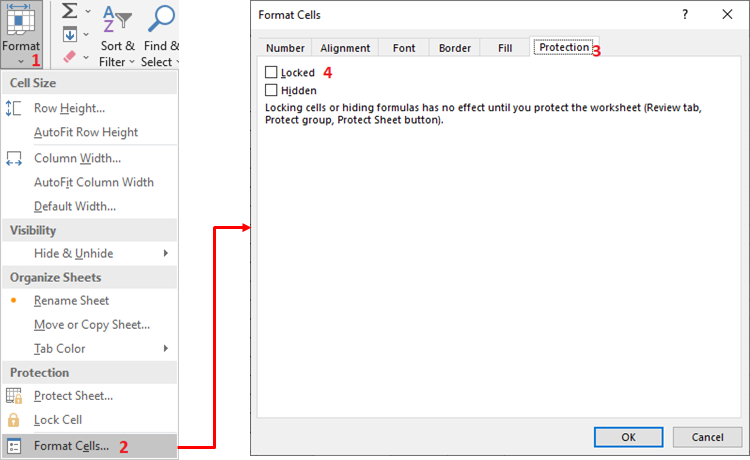
- Open the Format menu in the Cells group on the Home tab of the Ribbon and click the Format Cells... button.
- The Format Cells dialog box will open. Click on the Protection tab
- On the Protection tab, uncheck the Locked checkbox.
- Click on the OK button.

Sheet protection
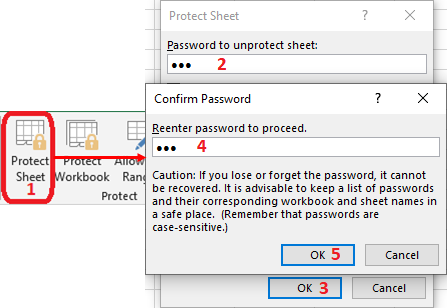
- Use the Protect Sheet command in the Protect group on the Review tab of the Ribbon.
- In the Protect Sheet dialog box that opens :
- Enter a password in the Password to unprotect sheet field
- You can set permissions to the list below Allow all users of this worksheet to.
- Click on the OK button
- Confirm the password
- Click on the OK button.

Remove Sheet Protection
Note that when Sheet Protection is enabled, the Protect Sheet button in the Protect group on the Review tab of the Ribbon is now called Unprotect Sheet.

If necessary, use this button to deactivate the sheet protection. You will be prompted to provide the password you set when protecting the sheet.