Word 2016 Mailings
The Word Mailings allows the generation of multiple documents from a template document by adding information from a list. The list of information can come from an Excel file or another data source. The documents produced can be personalised, printed or sent by e-mail.
For example, the following sample letter:

This invitation must be addressed to all or some of the members of an association. The list of members is saved in an Excel file. The text Mr/Mrs, First name, Last name and City in the extract above must be replaced for each member by the corresponding information from the Excel sheet.
Here is an extract from the Excel sheet:
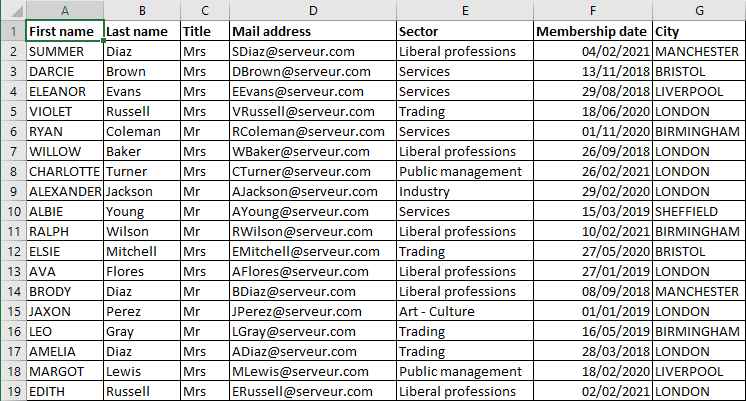
You can download the sample letter file and the list of members of the association.
Proceed as follows to create a letter for each of the 1475 members according to the template above:
Step 1: Start Mail Merge
Open the Word template letter file and click the Start Mail Merge menu on the Mailings tab of the Ribbon.

Under this menu you will find the options :
- Letters
- E-mail Messages
- Envelopes
- Labels...
- Directory
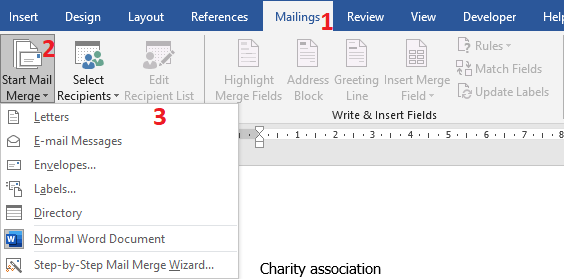
Practically the difference between these options relates to the layout of the documents produced. The technique described below will be the same regardless of which option is chosen.
The "Normal Word Document" option deletes all the mailing setups you have made.
Click on the Letters option.
Step 2: Selection of recipients
This step consists of defining the source of data to be integrated into the template document. For our example, this will be the link to the list saved in the Excel file.
Click on the Select Recipients menu on the Mailings tab of the ribbon. There are 3 options available:
- The 1st option: Type a New List... In this case you will get the New Address List dialog box where you can enter the list of recipients.
- The 2nd option: Use an Existing List... In this case you will have the Windows File Explorer allowing you to select a data source file.
- The 3rd option: Choose From Outlook Contacts... This requires Outlook to be configured on your computer.

For our example, use the 2nd option Use an Existing List... Then use Windows File Explorer, which opens, to point to the Excel file containing the list of members.
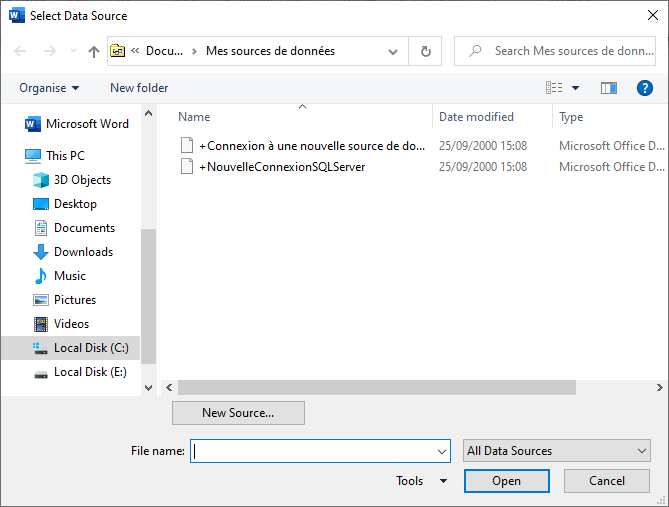
This opens the Select Table dialog box, allowing you to select the sheet where the list of subscribers is written... Remember that an Excel file can contain many sheets.
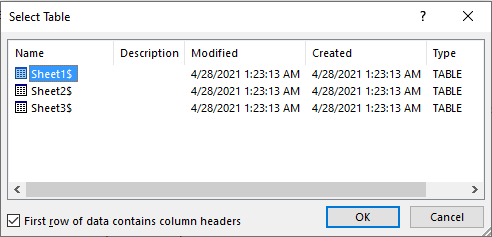
Select the sheet Sheet1. And click on the OK button.
Now notice :
- The controls on the Mailings tab of the Ribbon that have become active.

- If you open the Insert Merge Field menu, you will see the column headers of the linked Excel sheet.
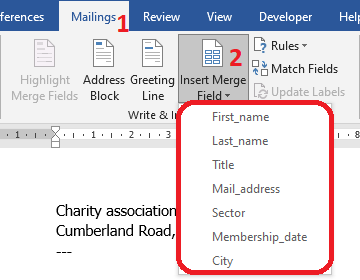
- If you click on the Last Record button, the value 1474 is displayed in the Go to Record field.

However, no information from the list of members is yet integrated into the document.
Step 3: Inserting merge fields
In this step, we will replace the text Mr/Mrs, First name, Last name and City in the template document with the information from the list of subscribers in the Excel sheet. To do this, we need to :
1. Open the Word template letter file
2. Select the text Mr/Mrs or delete it.
3. Open the Insert Merge Field menu on the Mailings tab of the Ribbon and click on Title

The Title submenu is the header of column C of the linked Excel sheet. Each cell value in column C will be inserted into the document producing 1474 copies. Each copy relates to a subscriber of the association.
Repeat steps 2 and 3 for the text "First name", "Last name" and "City".
The merge fields are displayed as the column headers of the linked list surrounded by inverted commas.
4. Click the Preview Results command on the Mailings tab of the Ribbon. Notice that the column headers are replaced by the data retrieved from the list.
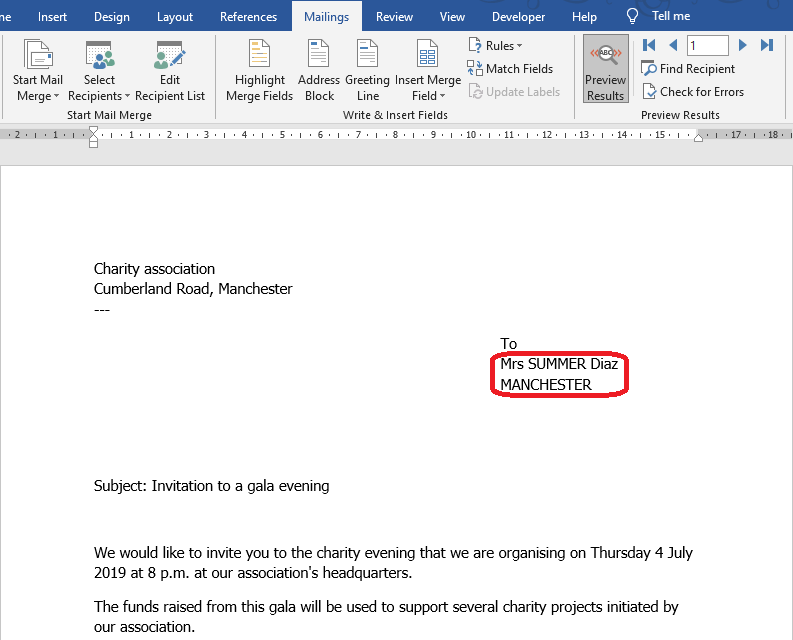
Note. If you want to deactivate the Preview Results mode, click on this command again.
5. Use the buttons in the Preview Results group on the Mailings tab of the Ribbon to navigate between the records in the list. You can also enter a number in the Go to Record field and press Enter on the keyboard to go to the corresponding record.

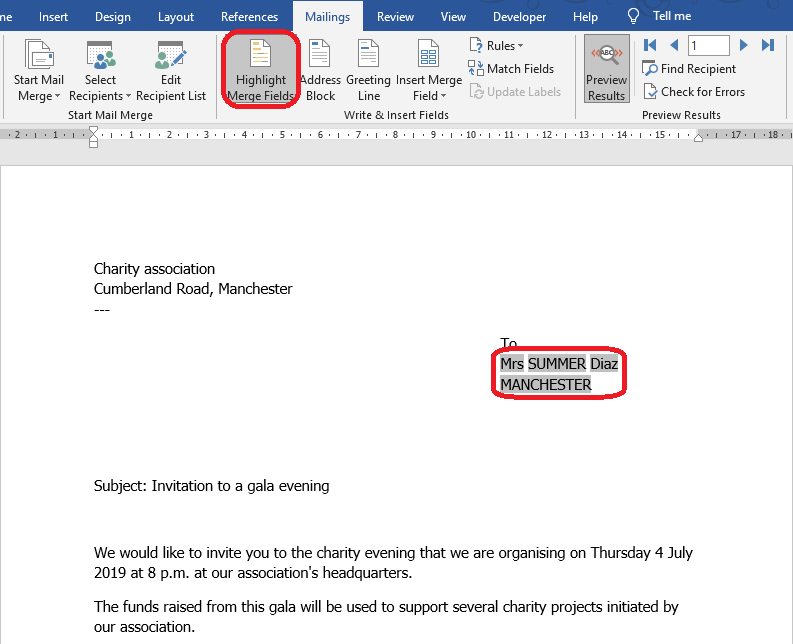
NB. If you need to highlight merge fields, which is useful when the document contains a large number of fields, use the Highlight Merge Fields command on the Mailings tab of the Ribbon. You can disable this display mode by clicking on this command again.
Step 4: Finish & Merge
By clicking on the Finish & Merge menu on the Mailings tab of the ribbon, 3 options are available:
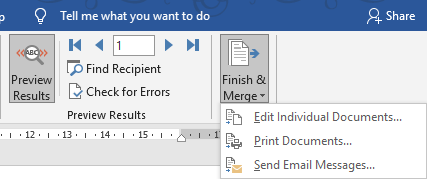
1. The 1st option: Edit individual Documents...
If you click on this option, the Merge to New Document dialog box appears. This dialog box allows you to select the records, i.e. rows, from the linked Excel list that will be used for the merge.
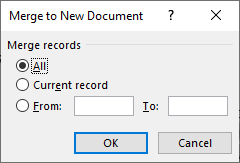
In this case, a new document corresponding to the selected records is created. This is particularly useful if you want to modify the pages for a few records.
The resulting document can then be printed or saved on your computer.
2. The 2nd option: Print Documents...
If you click on this option, you will also get the Merge to New Document dialog box. The only difference with the 1st option is that in this case the pages corresponding to the selected records will be printed directly.
3. The 3rd option: Send Email Messages...
If you click on this option, the Merge to E-mail dialog box appears:
- In the To field, select the column of the linked Excel list which contains the e-mail addresses of the recipients.
- In the Subject line field, enter the subject of the e-mail. In our case "Invitation to a gala evening" for example.
- In the Mail format list, leave the default option HTML if you want the text formatting and graphics embedded in the document to remain included in the sent messages.
- Then define which records in the linked Excel list will be affected by the Mail sending operation.
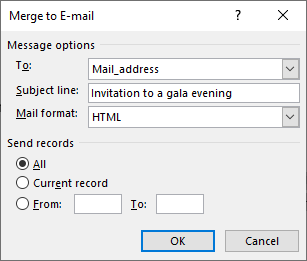
Note. This requires Outlook to be configured on your computer. This configuration defines the sender of the message, which must be your email address.
Other step: Modify the list of recipients
What do you do if you want to exclude some people, for example, or if the people concerned by your letter are only the subscribers living in a certain city...?
To do this, use the Edit Recipient List command on the Mailings tab of the ribbon.

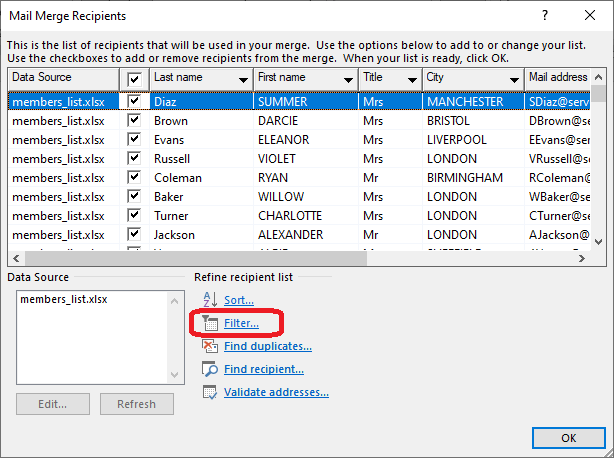
This opens the Mail Merge Recipients dialog box, which shows the list of recipients extracted from the linked Excel file.
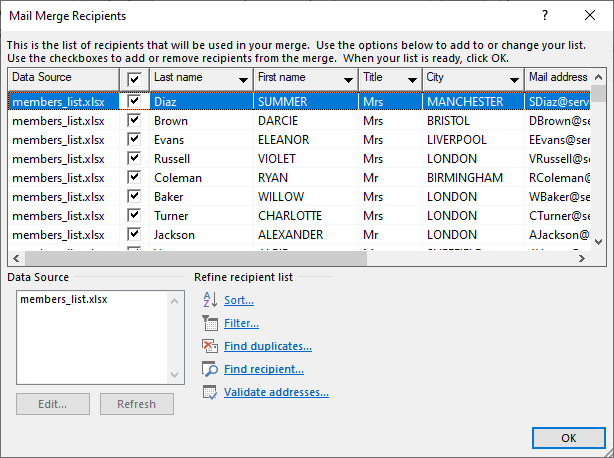
Suppose you want to produce the letter only for a few people on the list. To do this :
- Click on the checkbox at the top of the list to uncheck all recipients
- Then click on the boxes for the recipients you want to add.
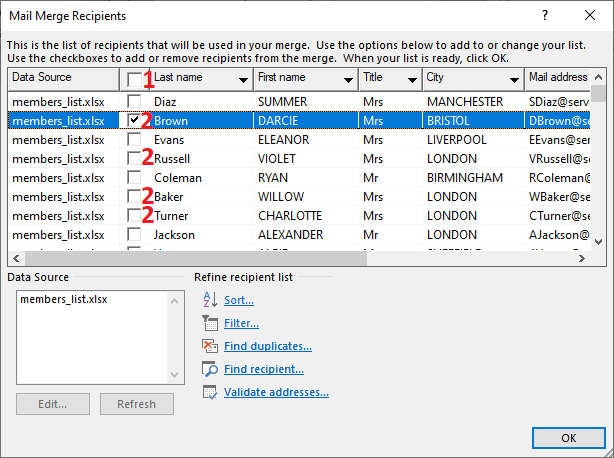
You can also use this dialog box to filter the list. For example, let's assume that we only want to invite subscribers from the city of Manchester.
NOTE. If you filter the data in the Excel file, this filter will not be taken into account.
On the other hand, you can use the Mail Merge Recipients dialog box, to filter the data. Click on the link Filter...
The Filter and Sort dialog box opens. In this dialog box :
- Select "City" in the Field list
- Select "Equal to" in the Comparison list
- Enter the value "MANCHESTER" in the field Compare to
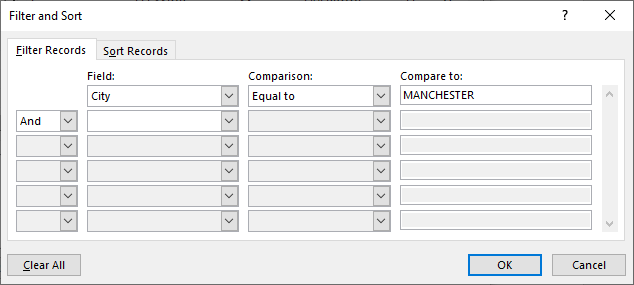
NB. You can use this dialog box to add other filter criteria.